diy: sdsa vintage side seam zipper insertion
Zipper time, everyone! If you've decided to use the recommended invisible zipper in the side seam, then go ahead and install it according to the package directions (or check out a tutorial. There are a lot out there, so this is certainly not the only one!). I cannot recommend enough that you should also have an invisible zipper foot to install it with; it is very frustrating and nearly impossible to get a smooth and professional installation otherwise.
Me? I prefer regular, old-fashioned zippers; particularly on dresses like the Swing Dress that harken back to another era. Today I'll be covering my favorite insertion method for a side-zipper-opening: the dress placket zipper. It's the "overlap" style that you see on a lot of dresses from this era; I originally taught myself how to do this method from a 1940s sewing manual!
Do keep in mind though that you need a 5/8" to 3/4" seam allowance to work with. If you don't, you can easily add additional width by seaming on narrow strips of fashion fabric to your side seam allowances over the zipper opening (on this pattern between the bodice and skirt side seam notches)--which is perfectly period and I've seen suggested in several sewing books of the era.
Prepare your zipper prior to sewing it in. Does it need to be shortened? Also press the zipper flat with your iron at a low-heat setting. Most zippers over a certain length come folded up in the package, and you want to get those creases out!
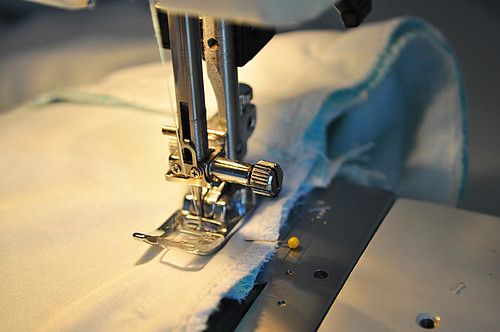
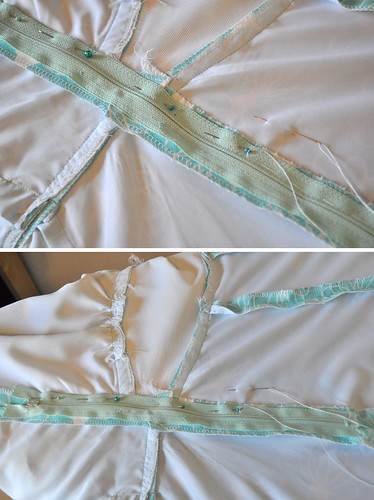
To begin with, baste the seam opening using large stitches so you can easily remove them later (on my machine I usually set it to a 4 or 4.5 stitch length). Press seam open.

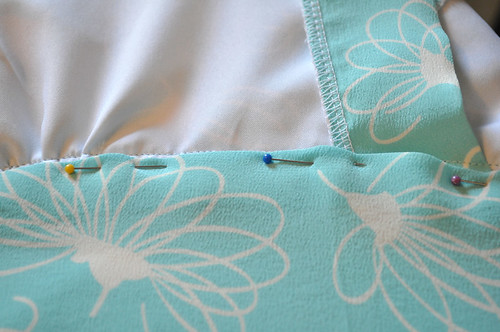
With the dress inside out, mark the top and bottom of your zipper opening with pins at either end, or a chalk line. Turn under the back seam allowance so that 1/8" is visible along the seamline and pin.

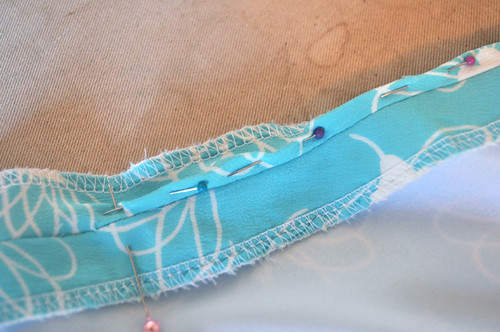
Lay the zipper right side up, the top (pull) facing towards the top of the garment and side seam opening. Place the folded back edge over the right side of the zipper tape, pinning it close to the teeth (but not so close you can't open the zipper!). Hand baste the foldline to the zipper tape.
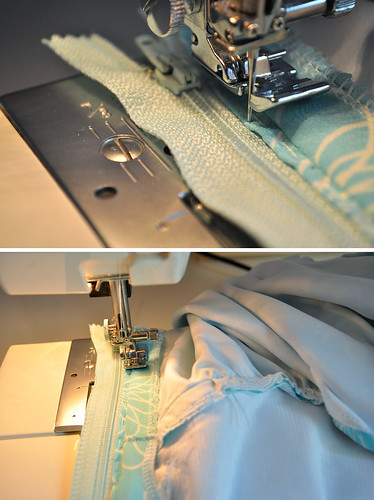
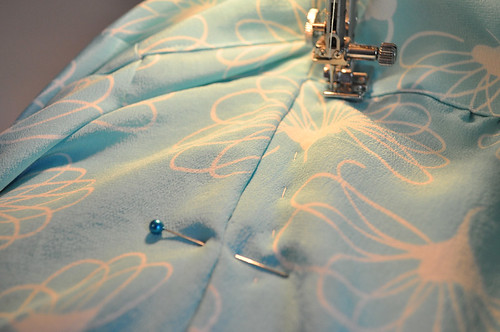
Using a zipper foot, stitch by machine as closely to the edge of the back fold as possible, through the zipper tape. Start and stop at the point you previously marked where the opening begins and ends. Backtack/secure the thread ends. This is how it looks after stitching:
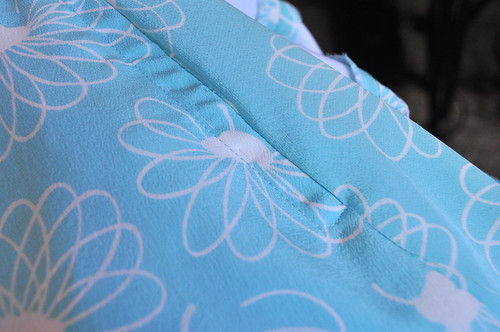
Flip the zipper over, so the unsewn edge is positioned overtop the front seam allowance. Smooth the zipper over the seam allowance, and pin. Make sure there is not a fold on the back seam allowance; everything should be smooth and flat. Hand baste in place just to the outside of the zipper teeth (this will act as your stitching line guide, so try and keep it straight).
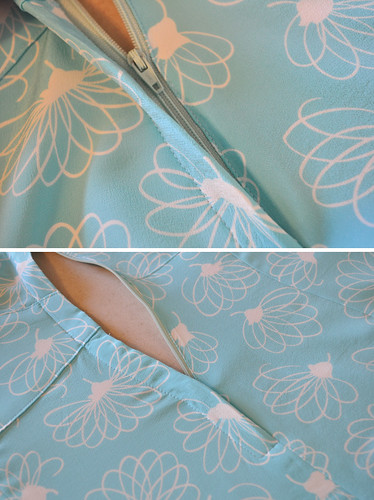
Turn your dress right side out. Mark where the pull at the top and stopper at the bottom is with pins (you don't want to stitch over these--they could result in broken needles!). Begin sewing at the bottom just below the marking pin, from the side seam to about 1/2" (or just outside your basting). Pivot and begin sewing up along the length of the zipper. Stop above the top marking pin, pivot and sew to the side seam. See below diagram:
Bring the threads to the inside and tie off at the top and bottom of the zipper. Lightly press.
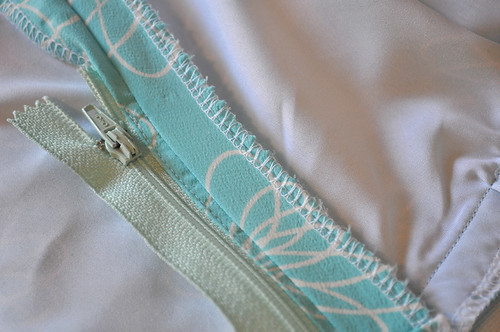
Remove the hand basting stitches. Now carefully clip or remove the basting on the side seam that you did at the beginning. Your zipper placket is now done! Don't you feel accomplished? It's not an easy style to master, but sure does help add a bit of an authentic look to reproduction pieces from this era. Sometimes I attach a hook and eye at the waist seam if needed.
We're just a couple steps away from finishing! I'll be briefly touching on hemming later in the week (Thursday hopefully), and then the dress will be complete. In the meantime, you can also go ahead and cover those shoulder pads if you wish with fashion or underlining fabric, and tack down the neckline facing at the shoulders and center back with a few inconspicuous stitches. I also went ahead and used Anna's method I shared earlier for finishing the inside of the midriff area; it looks pretty spiff with the dress fabric inside if I do say so myself!
So tell me: how are things coming with your Swing Dress? Did you get any work done on it over the weekend?
Me? I prefer regular, old-fashioned zippers; particularly on dresses like the Swing Dress that harken back to another era. Today I'll be covering my favorite insertion method for a side-zipper-opening: the dress placket zipper. It's the "overlap" style that you see on a lot of dresses from this era; I originally taught myself how to do this method from a 1940s sewing manual!
Do keep in mind though that you need a 5/8" to 3/4" seam allowance to work with. If you don't, you can easily add additional width by seaming on narrow strips of fashion fabric to your side seam allowances over the zipper opening (on this pattern between the bodice and skirt side seam notches)--which is perfectly period and I've seen suggested in several sewing books of the era.
Prepare your zipper prior to sewing it in. Does it need to be shortened? Also press the zipper flat with your iron at a low-heat setting. Most zippers over a certain length come folded up in the package, and you want to get those creases out!
To begin with, baste the seam opening using large stitches so you can easily remove them later (on my machine I usually set it to a 4 or 4.5 stitch length). Press seam open.
With the dress inside out, mark the top and bottom of your zipper opening with pins at either end, or a chalk line. Turn under the back seam allowance so that 1/8" is visible along the seamline and pin.
Lay the zipper right side up, the top (pull) facing towards the top of the garment and side seam opening. Place the folded back edge over the right side of the zipper tape, pinning it close to the teeth (but not so close you can't open the zipper!). Hand baste the foldline to the zipper tape.
Using a zipper foot, stitch by machine as closely to the edge of the back fold as possible, through the zipper tape. Start and stop at the point you previously marked where the opening begins and ends. Backtack/secure the thread ends. This is how it looks after stitching:
Flip the zipper over, so the unsewn edge is positioned overtop the front seam allowance. Smooth the zipper over the seam allowance, and pin. Make sure there is not a fold on the back seam allowance; everything should be smooth and flat. Hand baste in place just to the outside of the zipper teeth (this will act as your stitching line guide, so try and keep it straight).
Turn your dress right side out. Mark where the pull at the top and stopper at the bottom is with pins (you don't want to stitch over these--they could result in broken needles!). Begin sewing at the bottom just below the marking pin, from the side seam to about 1/2" (or just outside your basting). Pivot and begin sewing up along the length of the zipper. Stop above the top marking pin, pivot and sew to the side seam. See below diagram:
Bring the threads to the inside and tie off at the top and bottom of the zipper. Lightly press.
Remove the hand basting stitches. Now carefully clip or remove the basting on the side seam that you did at the beginning. Your zipper placket is now done! Don't you feel accomplished? It's not an easy style to master, but sure does help add a bit of an authentic look to reproduction pieces from this era. Sometimes I attach a hook and eye at the waist seam if needed.
We're just a couple steps away from finishing! I'll be briefly touching on hemming later in the week (Thursday hopefully), and then the dress will be complete. In the meantime, you can also go ahead and cover those shoulder pads if you wish with fashion or underlining fabric, and tack down the neckline facing at the shoulders and center back with a few inconspicuous stitches. I also went ahead and used Anna's method I shared earlier for finishing the inside of the midriff area; it looks pretty spiff with the dress fabric inside if I do say so myself!
So tell me: how are things coming with your Swing Dress? Did you get any work done on it over the weekend?


Comments
Post a Comment
Thank you so much for taking time to comment! I LOVE hearing feedback from readers. I welcome truly constructive and thoughtful critique and suggestions, but will not hesitate to delete spam or downright rude comments.