diy: sdsa muslins + drafting side seam pockets
 So how is your muslin fitting coming along? I finally got a chance to try mine on this week and take a few notes about any changes that needed to be made. Even though I've fit this pattern previously, what kind of sew-along leader would I be if I didn't start from scratch again and follow along with my own sew-along? lol. The only thing I decided not to refit is the sleeves; I just used my old pattern that I had already adjusted the sleeve ease.
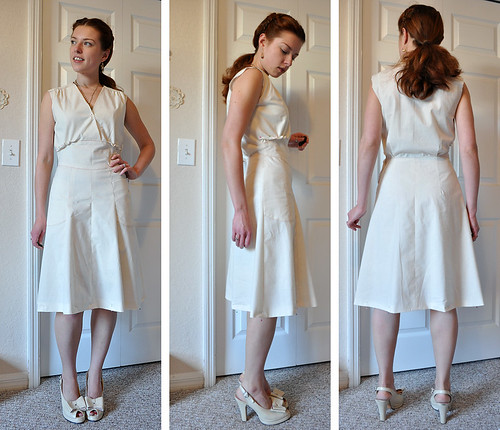
Overall I'm fairly happy with my muslin and the changes I made prior to cutting this out. One thing I did test were patch pockets, which did need a bit of revision (more room for the hand! Lesson no. 1: do not draft any pattern pieces after 9pm... lol!), but redid the tutorial this morning to reflect those changes. I still have not decided if I want to do patch pockets or side seam pockets! The only issue is that pockets set into the side seam present certain new steps and hurdles since the dress has a left side-seam zipper. It's not impossible (see the pockets section below for more information on this!), but I think I'm going to run through a test to make sure I have my head properly wrapped around how to do this. Here are the changes I'm going to make to my final pattern based on my muslin fitting observations:
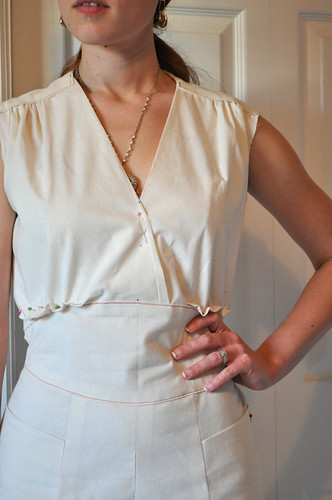
- Take off a smidgen of length underneath the bust gathering. The SBA I did prior to the muslin really helped a lot with the fit of the bodice, but I could still use to loose about 3/8"-1/2" under that gathered portion. All the other length measurements for the bodice (center front and side seam) are correct. Notice the bodice isn't skin tight--it still has some blousiness as is necessary for this style.
- Let out the center front seam about 1/4" over the tummy. I have a little "belly" over that area, and these pictures were taken right before dinner, so it only gets bigger after a meal! lol. Letting out a teeny bit will just make things more comfortable. I'll probably also add a bit more to the midriff piece as well over the bottom edge.
- Shorten the skirt a tiny bit. I only want to take off about 3/4" of length to have the hem hit at the most flattering level at my knees.
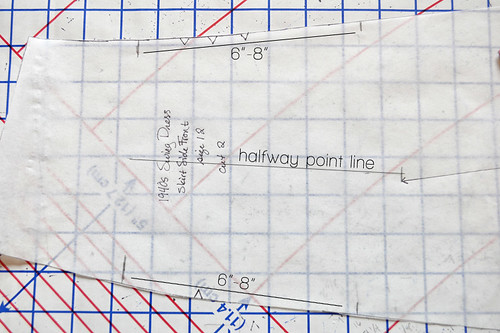
Measure down from the top edge 3" along the side with three notches (joins the center front piece) and 4" along the edge with one notch (side seam); mark. (If you'd prefer your pocket further down from the waist, you can increase these measurements as required.) From these marks measure down 6" to 8" (this will be the pocket depth; it depends on your preference and hand size). At each of these points, measure and find the center point across to create a vertical center line down the depth of your pocket.
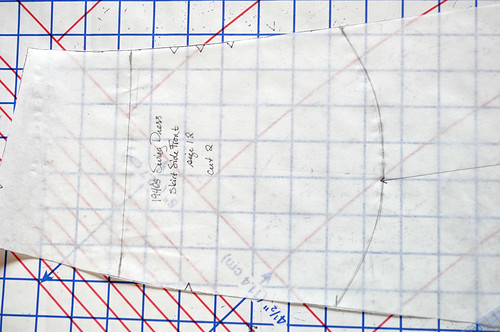
Place a piece of tracing or translucent pattern paper over the skirt piece. Trace the outline of the pocket as plotted on the skirt. Now we are going to add a bit of ease into the pocket so you can fit things in! At the top add 5/8" to 3/4" at either edge. Blend this new top edge width into the side seams (dotted lines), being sure to transfer the notches along the new edge lines. Also transfer the grainline from the skirt piece onto the pocket.

Remove the skirt pattern. Add 1/2" along the bottom edge for turning under. Along the top edge measure up 1 1/2" and draw a line parallel to the top edge.
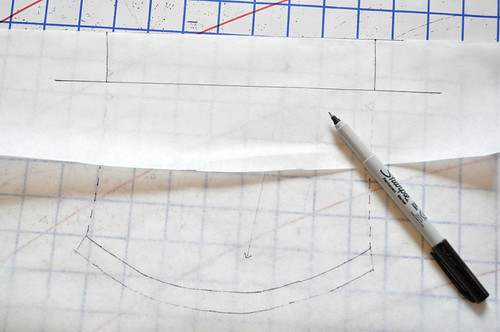
Fold the top edge under along the original top edge line. Trace the outline of the side edges onto the 1 1/2" facing. (This ensures that when you turn the facing edge under it will match up along the side edges neatly.)
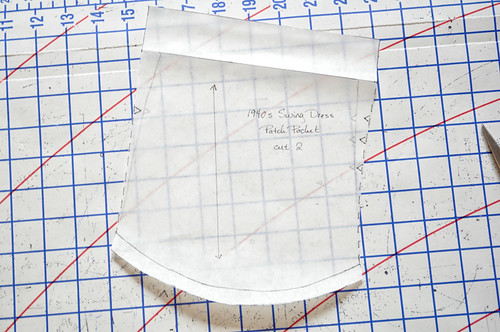
Now you have a finished pocket piece! To construct, turn under the 1/2" and press; do the same for the facing edge turning under 1 1/2". Pin the pocket to the skirt side front, matching notches. Top stitch along the bottom edge to the skirt; baste along the side seams to tack the pocket in place. The side edges will be caught into the skirt seams when it's sewn up.
Would you prefer pockets set into the side seam? These are the type of pocket that are hidden on the inside and are formed with two seperate pieces seamed to the front and back side seams and joined to for a bag. The only tricky part of doing this sort of pocket with this style of dress is that the zipper is inserted in the side seam. Adding this style of pocket with a zipper at the side is note impossible; but it is probably best reserved for those of you planning to use an invisible zipper or centered zipper insertion; if you plan on doing a 40s-style lapped placket insertion it may get a bit tricky. I plan on playing with this a bit next week to see if it's possible though! But without further ado, here's how to draft your own pocket pieces:
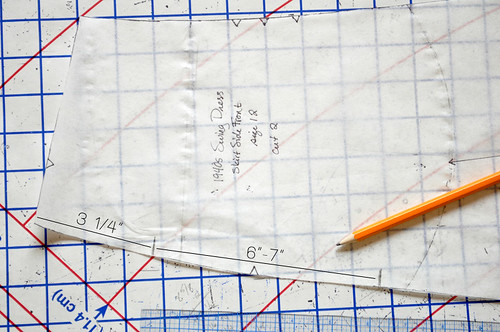
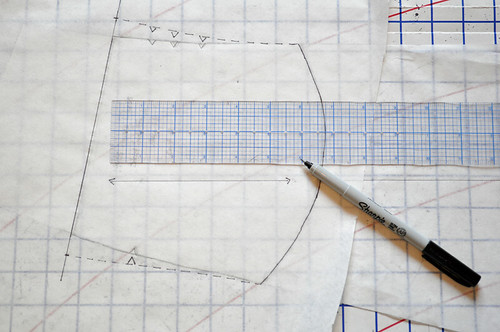
Measure down along the side seam (one notch edge) 3 1/4" (or more, depending on your pocket-level preference) and then 6"-7" from that mark for the pocket depth.
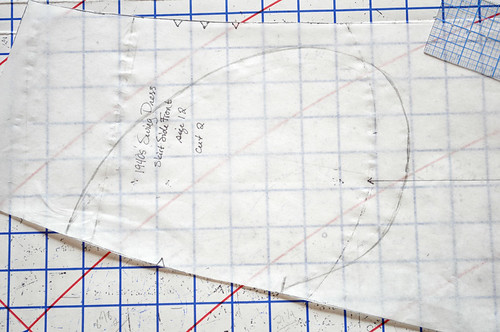
Draw the pouch shape for the pocket, being sure to drop the bottom edge of the pouch below the side seam opening level.
Place a piece of tracing or translucent pattern paper over the skirt piece. Trace the outline of the pouch piece, transferring the notch and grainline markings.
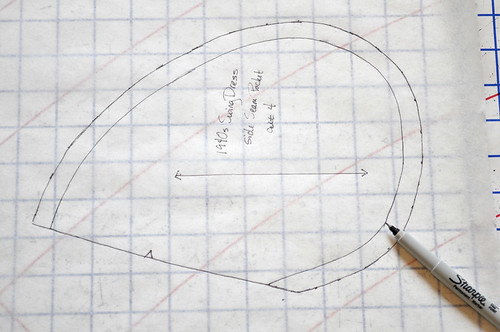
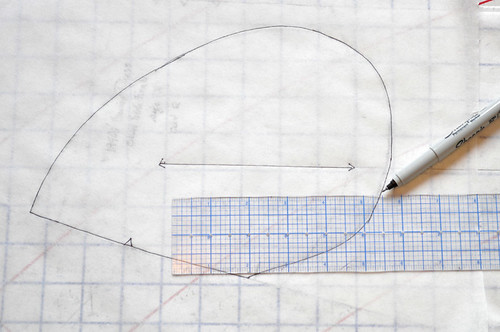
Add 1/2" seam allowance to the curved edge (not the side seam). Be sure to refer to this tutorial for information on constructing the pocket to set it in a side seam with a zipper.


Comments
Post a Comment
Thank you so much for taking time to comment! I LOVE hearing feedback from readers. I welcome truly constructive and thoughtful critique and suggestions, but will not hesitate to delete spam or downright rude comments.